Let's start this time with a simple question. Have you ever found yourself tangled in a web of different report versions, feeling utterly lost? Or caught yourself pondering over how to neatly organize your Power BI projects? If you're nodding along, then breathe a sigh of relief. You're not alone, and better yet, there's a solution. This question was difficult to answer in the past but not anymore. You've stumbled upon the definitive guide to mastering the art of report maintenance.
Managing the lifecycle of a report is a complex task that requires a lot of thought and planning. Remember the key steps we uncovered in our last chat? Great! In this blog, we focus on establishing robust source control strategies for Power BI assets. These strategies are crucial for maintaining integrity, efficiency and version management, especially in a collaborative environment.
Table of Content
- Introduction
- Install Git and create a GitHub account
- Create a local git repository
- Understanding Git under the hood
- Add a Power BI project file and create a commit
- Create a new repository on GitHub
- Get changes on GitHub back to your system
- Continuing your Journey
Introduction
Whether you're creating reports for personal use or within an organization, the moment you start juggling multiple versions and copies of your data and reports, that's when the real fun begins. And by fun, I mean the urgent need for version control.
Platforms such as Azure DevOps or GitHub come into play, armed with Git, the wizard behind the curtain. Git isn't just any tool; it's your best friend when it comes to merging changes, keeping an eye on the entire development cycle of your reports, and making sure everything runs like clockwork.
Now, here's a little insider info: back in the day (well, until June 2023) your go-to options were limited to PBIX and PBIT files. Now, there's a new player in town - Power BI Projects or as we call it PBIP. However, keep this in mind - this feature is in public preview so some of its features may change before the general availability (GA) release.
But what is Version Control?
Picture this: You're deep into a video game, facing off against boss after boss. The last thing you want is to be sent back to square one every time you're defeated. The strategy? You save your progress at various checkpoints, ensuring you're not starting from scratch. Sounds familiar!
Version control is precisely what facilitates progress tracking in the real world, and its application is not confined to a single field. While it is often associated with software development and coding projects, it can be utilized for virtually any task that requires monitoring of changes. Consider working on a Power BI report; you begin with a basic version and as you refine it, you might add visuals, adjust the text, or reorganize elements.
Now, suppose you realize you made a mistake or want to revisit how the report looked a few days ago, or perhaps you've stumbled upon a blunder needing a fix. Without version control, you might end up saving multiple copies- each slightly different from the last!
That's where Version Control Systems (VCS) come to the rescue. VCS address this issue by maintaining a record of changes over time. They're like a time machine for your projects, preserving a history that tracks the modifications made, the individuals who made them, and when. This also facilitates safe collaboration without the risk of overwriting each other's contributions and allows for reverting to earlier versions of the work if necessary.
Version control is also often referred to as source control. Git is a version control system extensively used in the industry, operating on the principle of capturing snapshots of a project at different stages in its development.
This blog will dive into the nitty-gritty of Git, especially how it can be a game-changer for your Power BI projects.
Install Git and create a GitHub account
If Git is a new adventure for you, here's your first step: getting it set up. Just head over to the official instructions here to install Git, if it hasn't already found a home on your computer.
For those of you who've had exposure to Git before, you might already be familiar with the plethora of graphical user interfaces (GUIs). These GUIs are like the friendly faces of Git, offering a more user-friendly way to navigate without having to dive into the command line's depths. You are free to use those.
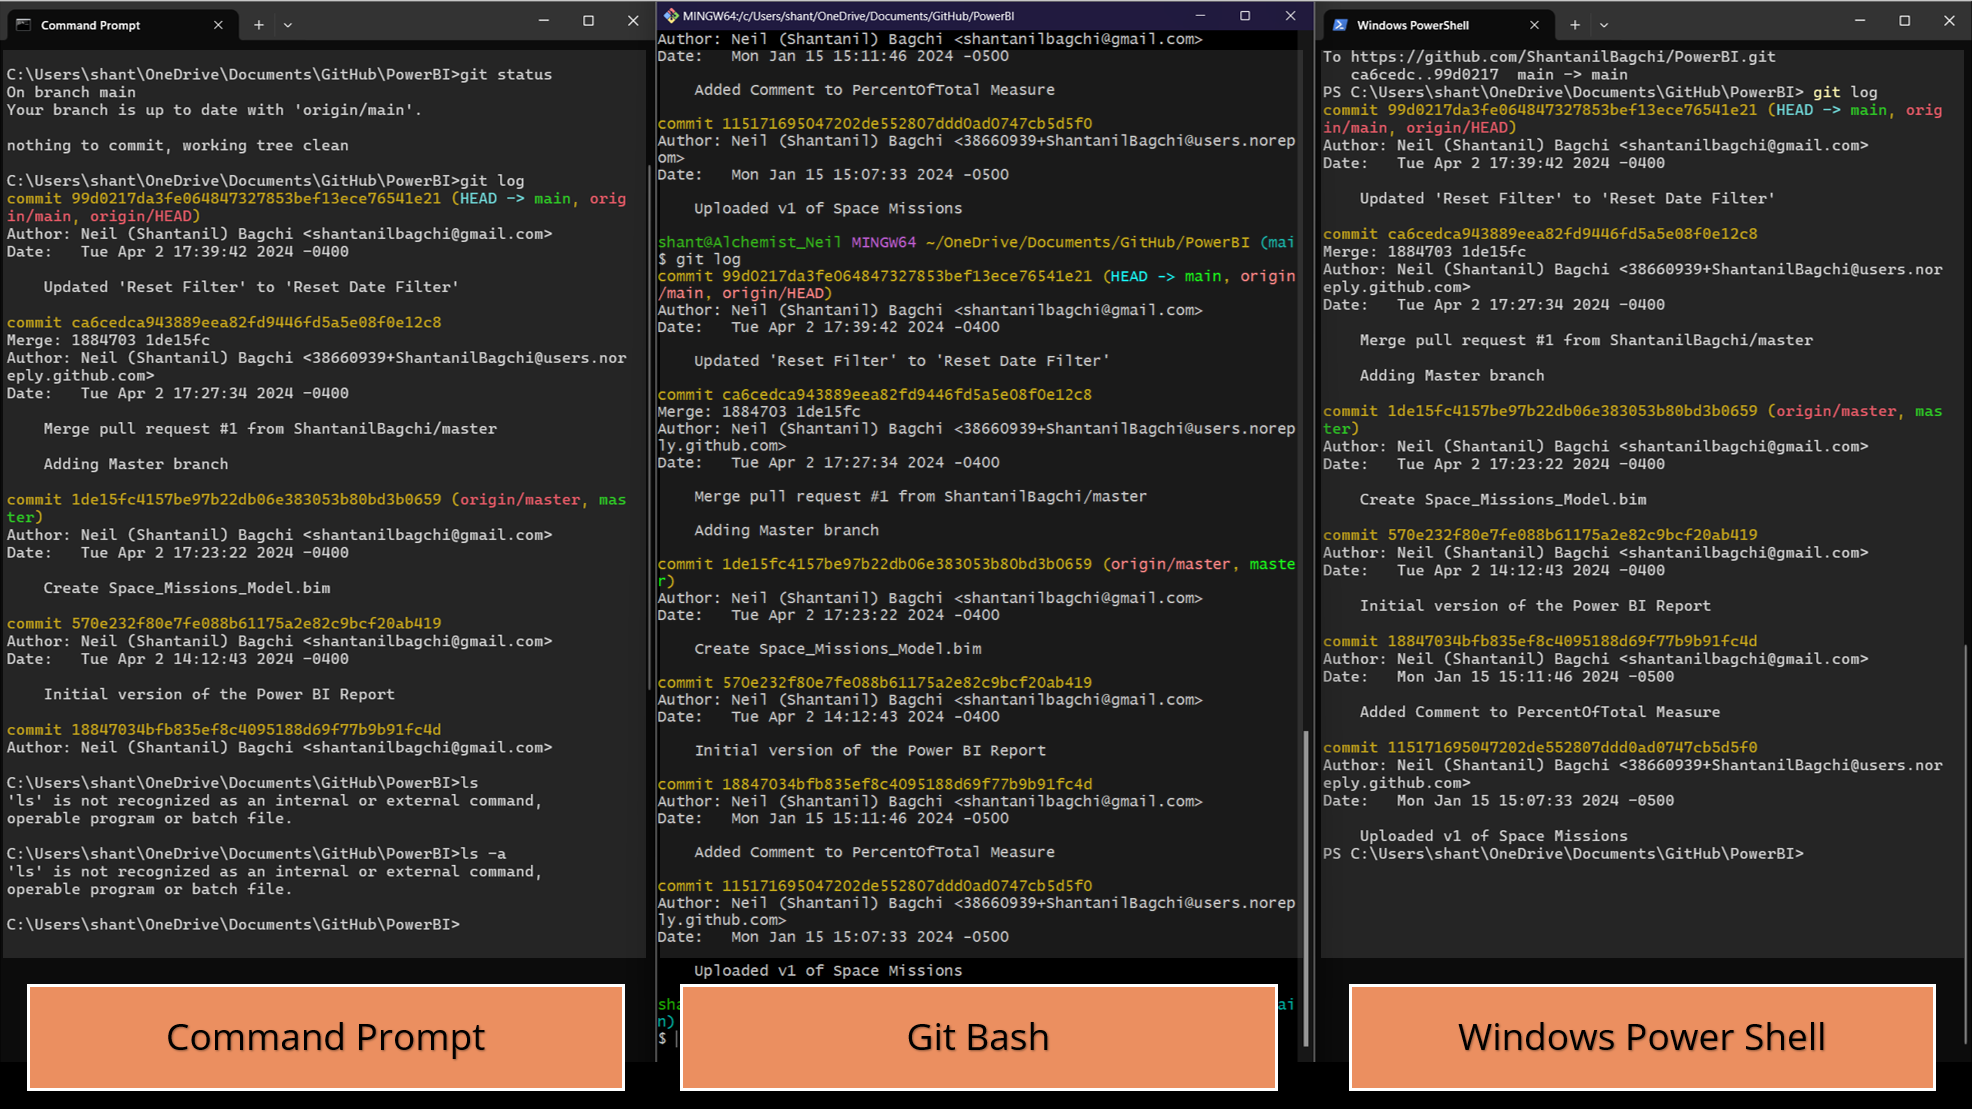
But here's a piece of advice for you: there's something invaluable about getting your hands dirty with the command line, git bash, or PowerShell right from the start. It's like learning to drive stick before you switch to automatic; it gives you a deeper understanding and control over what you're doing. As you can see below, you will get similar results in all the cases so use whatever you are comfortable with.
Once you've gained confidence, you can explore Git GUIs like VSCode, GitHub Desktop etc for a more visual experience.
Before we dive deeper, let's create a GitHub account here if you don't have one yet.
What's the difference between Git and GitHub?
These services like GitHub are known as "remotes" in Git terminology and there are several other alternatives including Azure DevOps, GitLab, BitBucket, and more.
Remember that it's not necessary to use GitHub to utilize Git.
Create a local git repository
Consider any Power BI (PBIP) project you want to work on; it typically involves source files, JSON files, .bim files and more. If we want to manage these files with Git, the first step is to create a Git repository (or 'repo' in short).
Think of a repo as a project folder that Git manages. It contains the entire collection of files and folders of your project, along with their entire history of changes. The file history appears as snapshots in time called commits. The commits can be organized into multiple lines of development called branches.
To start, open a terminal of your choice (in my case PowerShell) and navigate to the desired location for your project on your local machine using the 'cd' (change directory) command. For instance, I will create a 'Power_BI_Projects' folder on my system.
# I am using PowerShell (Windows)
# cd:= change directory

PS C:\Users\shant> cd C:\Users\shant\OneDrive\Documents\GitHub

# ls:= list all the folders
PS C:\Users\shant\OneDrive\Documents\GitHub> ls

    Directory: C:\Users\shant\OneDrive\Documents\GitHub


Mode                 LastWriteTime         Length Name
----                 -------------         ------ ----
da---l         3/27/2024  10:52 AM                Ghost
d----l         4/13/2023  12:46 PM                portfolio
d----l         4/13/2023  12:46 PM                shantanilbagchi.github.io
da---l         5/27/2023  10:20 AM                vsCode-SQL

# mkdir:= create a new directory/folder
PS C:\Users\shant\OneDrive\Documents\GitHub> mkdir Power_BI_Projects

# move to this new folder
PS C:\Users\shant\OneDrive\Documents\GitHub> cd .\Power_BI_Projects\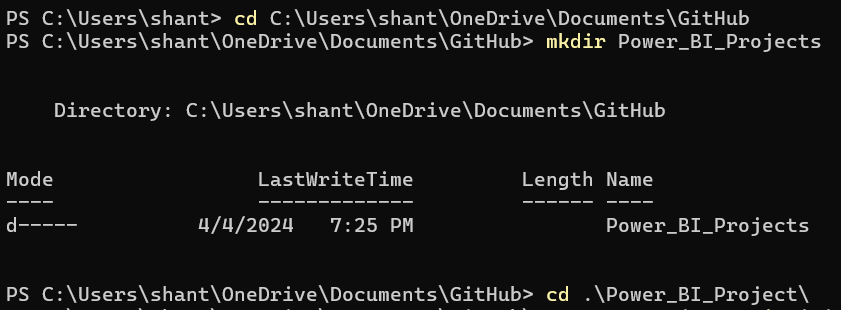
Let's think of Git as our assistant. We will use the git init command to inform Git that it should start tracking the changes in this folder or 'repo'. This will create/initialize a .git folder where Git will store all the snapshots and history.
git init initializes a brand new Git repository and begins tracking an existing directory. It adds a hidden subfolder within the existing directory that houses the internal data structure required for version control.# Initialize git
PS C:\Users\shant\OneDrive\Documents\GitHub\Power_BI_Projects> git init
Initialized empty Git repository in C:/Users/shant/OneDrive/Documents/GitHub/Power_BI_Projects/.git/
# ls -Force:= list hidden folders too
PS C:\Users\shant\OneDrive\Documents\GitHub\Power_BI_Projects> ls -Force
Directory: C:\Users\shant\OneDrive\Documents\GitHub\Power_BI_Projects
Mode LastWriteTime Length Name
---- ------------- ------ ----
da-h-l 4/4/2024 7:26 PM .git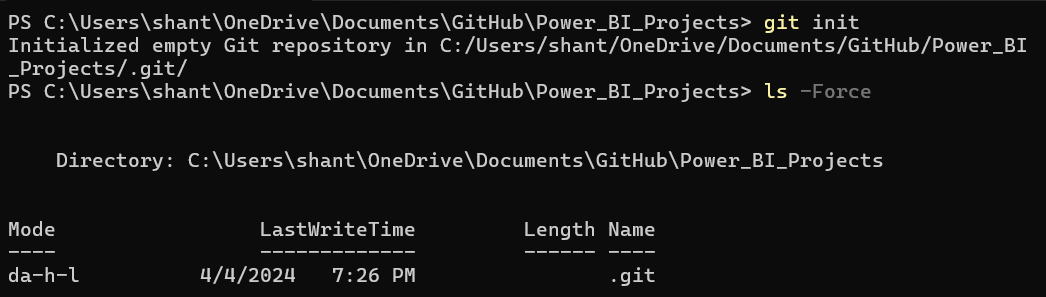
Understanding Git under the hood
Before we go any further, let's understand what happens between our local computer and GitHub Repositories.

When we create a project-folder (in our case 'PowerBI' folder) on our computer and start working on it, it is a working directory. At this point, our project-folder is not a repository. We used the git init command to make the project-folder into a repository. This creates a hidden folder called .git inside the main folder, which is called the repository. The .git represents the local repository, which includes the staging area and the commit history.
Note: Don't delete this hidden folder (.git) by mistake as this will delete all version histories and commits.
A commit is essentially a snapshot of our changes since the last commit. We modify our repository (by adding or changing files, for example), and then instruct git to capture those changes in a commit.
But how do we inform git which files should be included in a commit? Enter the staging environment. The Staging Area is like a draft space used to prepare and review modifications before they are committed to the Git repository. It enables selective inclusion of changes in commits, allowing for a thorough review before finalizing the changes.
When changes occur in our repository, git recognizes the modifications but doesn't automatically include them in a commit. To prepare a file for a commit, we must first place it in the staging environment using the git add command. After staging the desired files, we can command git to create a commit with the git commit command. Let's see how all these work.
Add a Power BI project file and create a commit
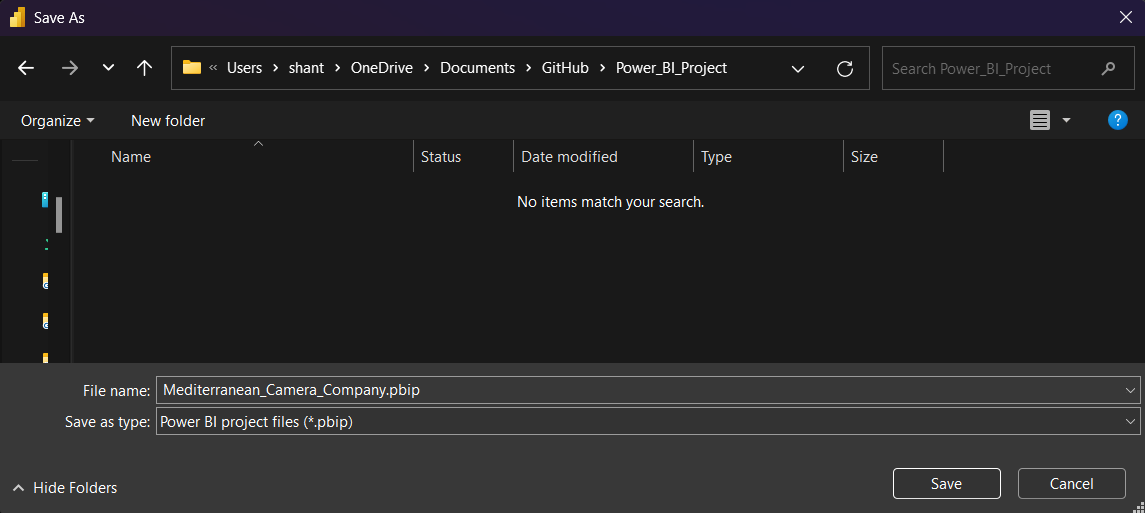
Let's save one of my existing Power BI reports as a project file (.pbip) in this newly created folder.
As discussed earlier, git recognizes the existence/modification of a file within the repository and you can check it using the git status command.
# use git status to track changes

PS C:\Users\shant\OneDrive\Documents\GitHub\Power_BI_Projects> git status
On branch master

No commits yet

Untracked files:
  (use "git add <file>..." to include in what will be committed)
        .gitignore
        Mediterranean_Camera_Company.Report/
        Mediterranean_Camera_Company.SemanticModel/
        Mediterranean_Camera_Company.pbip

nothing added to commit but untracked files present (use "git add" to track)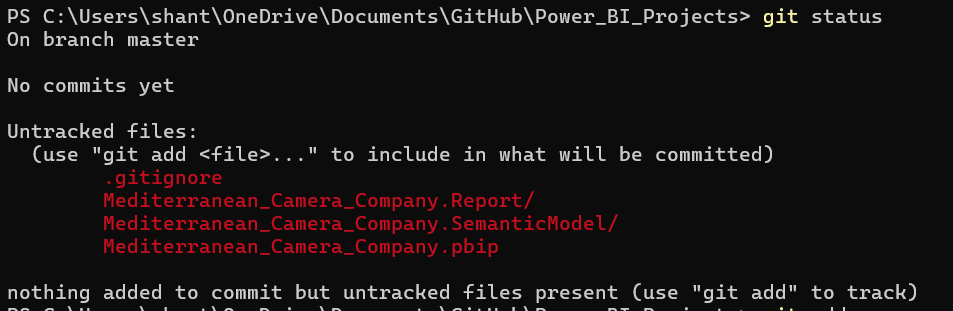
After you've made your intentions known with git add, rerun the git status command. It's like asking Git, "So, what's on your radar now?" And Git, now fully aware of its new responsibilities, will show the file under the "Changes to be committed" section. This section is what you'd call the staging area, a special spot where files wait quietly before they're officially committed to Git's memory. Think of it as the green room backstage before the big show, where everything's getting prepped and ready for the final act.
# git add . is used to add all the files and folders, even hidden ones

PS C:\Users\shant\OneDrive\Documents\GitHub\Power_BI_Projects> git add .
PS C:\Users\shant\OneDrive\Documents\GitHub\Power_BI_Projects> git status
On branch master

No commits yet

Changes to be committed:
  (use "git rm --cached <file>..." to unstage)
        new file:   .gitignore
        new file:   Mediterranean_Camera_Company.Report/.platform
        new file:   Mediterranean_Camera_Company.Report/definition.pbir
        new file:   Mediterranean_Camera_Company.Report/report.json
        new file:   Mediterranean_Camera_Company.SemanticModel/.pbi/editorSettings.json
        new file:   Mediterranean_Camera_Company.SemanticModel/.platform
        new file:   Mediterranean_Camera_Company.SemanticModel/definition.pbism
        new file:   Mediterranean_Camera_Company.SemanticModel/diagramLayout.json
        new file:   Mediterranean_Camera_Company.SemanticModel/model.bim
        new file:   Mediterranean_Camera_Company.pbip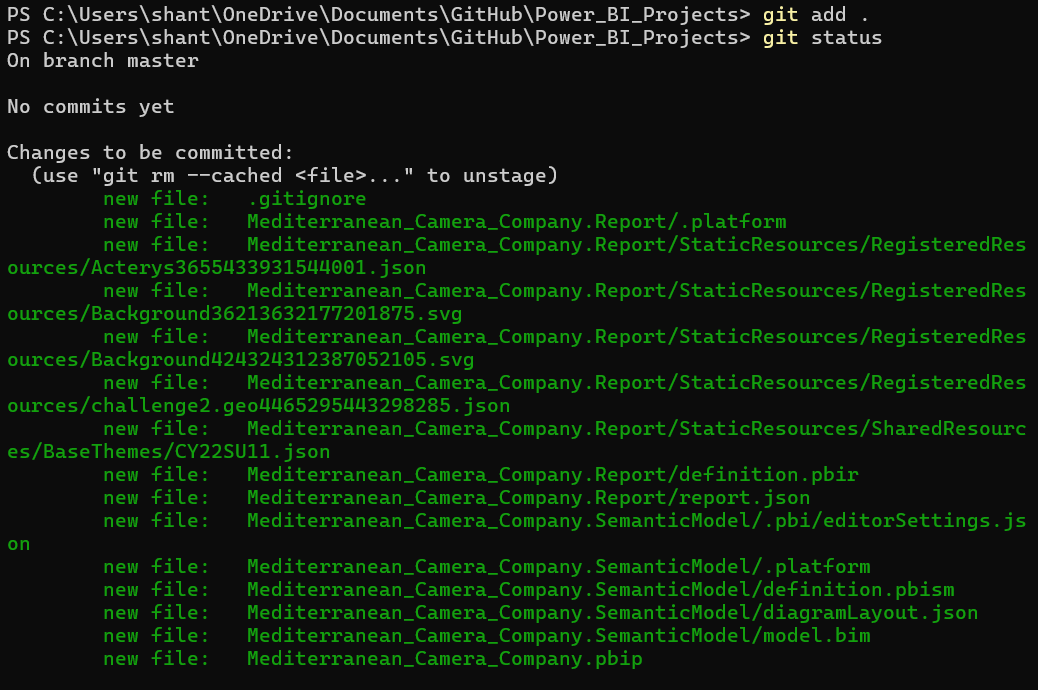
Alright, we've warmed up with the git add command, and our files are chilling in the staging area, waiting for their big moment. Now, it's time to seal the deal and make our first commit. We can run the command git commit -m "Your message about the commit". Here, -m stands for message, and it's your chance to attach a note to your snapshot, explaining what you've done. It's like scribbling on the back of a photograph, so when you or someone else looks back, you’ll remember exactly what this snapshot was all about.
#Adding proper messages with commits can help retrace back specific versions of the file
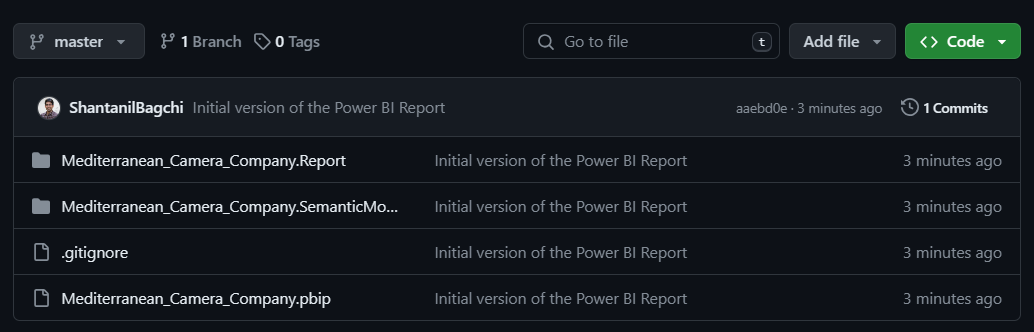
PS C:\Users\shant\OneDrive\Documents\GitHub\Power_BI_Projects> git commit -m "Initial version of the Power BI Report"
[master (root-commit) aaebd0e] Initial version of the Power BI Report
15 files changed, 39558 insertions(+)
create mode 100644 .gitignore
create mode 100644 Mediterranean_Camera_Company.Report/.platform
create mode 100644 Mediterranean_Camera_Company.Report/definition.pbir
create mode 100644 Mediterranean_Camera_Company.Report/report.json
create mode 100644 Mediterranean_Camera_Company.SemanticModel/.pbi/editorSettings.json
create mode 100644 Mediterranean_Camera_Company.SemanticModel/.platform
create mode 100644 Mediterranean_Camera_Company.SemanticModel/definition.pbism
create mode 100644 Mediterranean_Camera_Company.SemanticModel/diagramLayout.json
create mode 100644 Mediterranean_Camera_Company.SemanticModel/model.bim
create mode 100644 Mediterranean_Camera_Company.pbip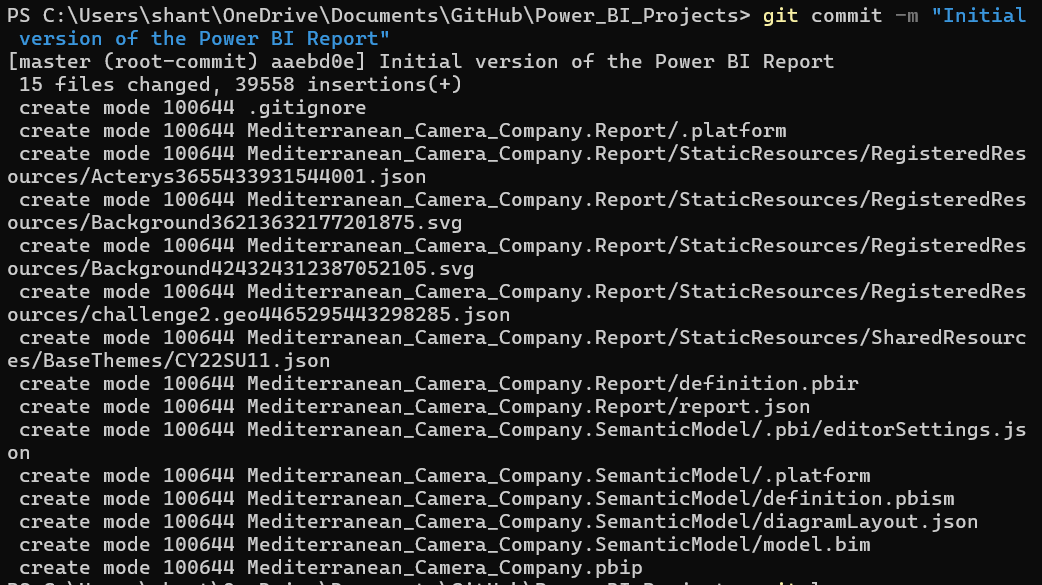
The commit message should reflect the content of the commit, whether it's a new feature, a bug fix, or a typo correction. Crafting a good commit message is like leaving breadcrumbs for future you or your teammates, offering clues and context about what was happening at this point in your project's history. It’s not just a formality; it's a lifeline for understanding the evolution of your work. We will use the command git log to see our commits.
#git log now shows us our first commit

PS C:\Users\shant\OneDrive\Documents\GitHub\Power_BI_Projects> git log
commit aaebd0ef9302d5c2317499697402e50105f342ea (HEAD -> master)
Author: Neil (Shantanil) Bagchi <shantanilbagchi@gmail.com>
Date:   Thu Apr 4 19:27:08 2024 -0400

    Initial version of the Power BI Report
Create a new repository on GitHub
If we wish to track your Power BI project solely on our local system, GitHub is not necessary (reminding it again here). However, involving GitHub adds a layer of collaboration and backup to your project, ensuring our Power BI files aren't lost in case our system crashes tomorrow.
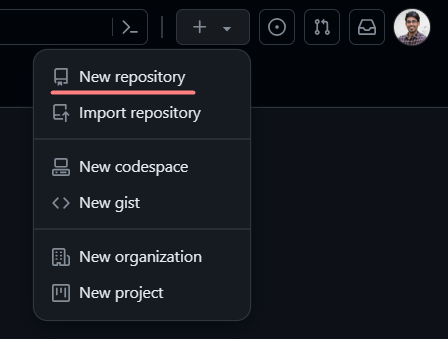
- Log into GitHub - Slide into the GitHub universe by signing in with your account.
- Spot the “New repository” option - Once you're in, look up to the top right corner of your screen. You'll see a "+" sign snuggled next to your profile picture. Click on that, and a dropdown menu will appear.
- Click “New repository” - In that dropdown, there’s an option that reads “New repository.” Give that a click, and you're on your way.
After clicking the button, GitHub will ask us to name our repo and provide a brief description:
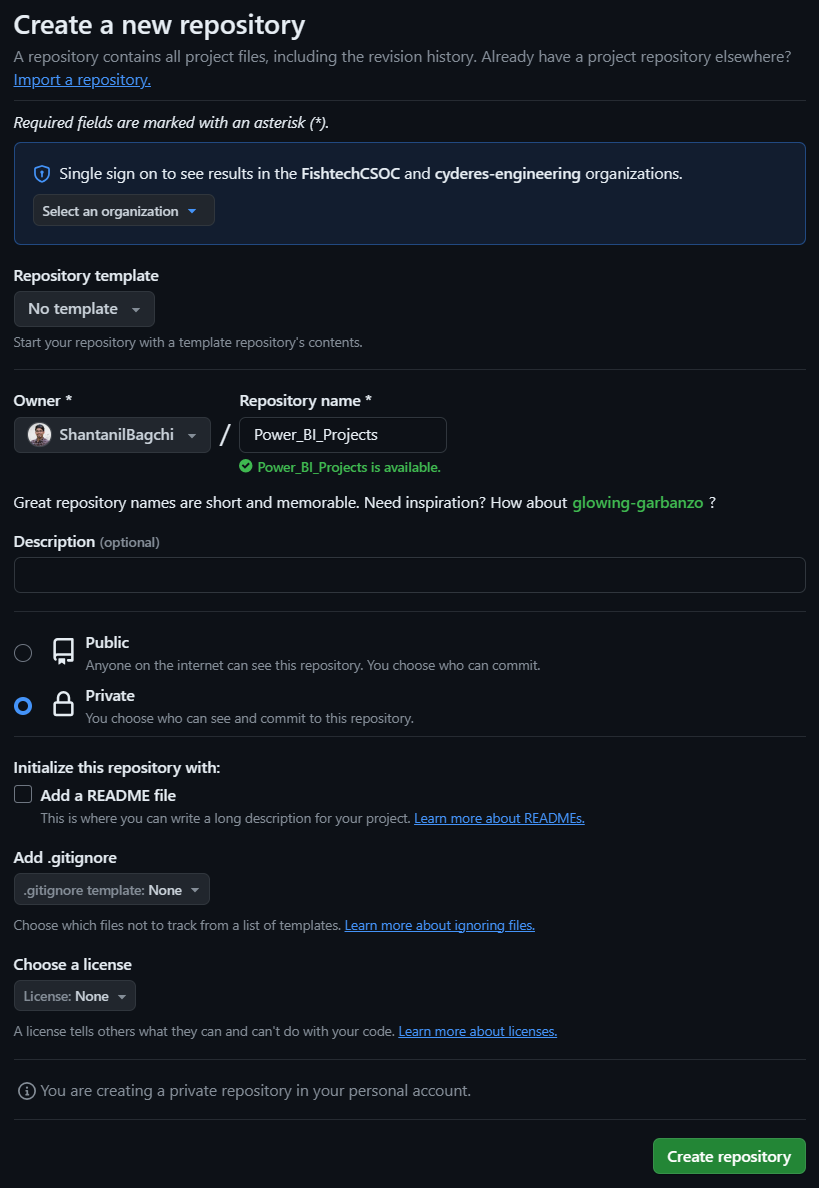
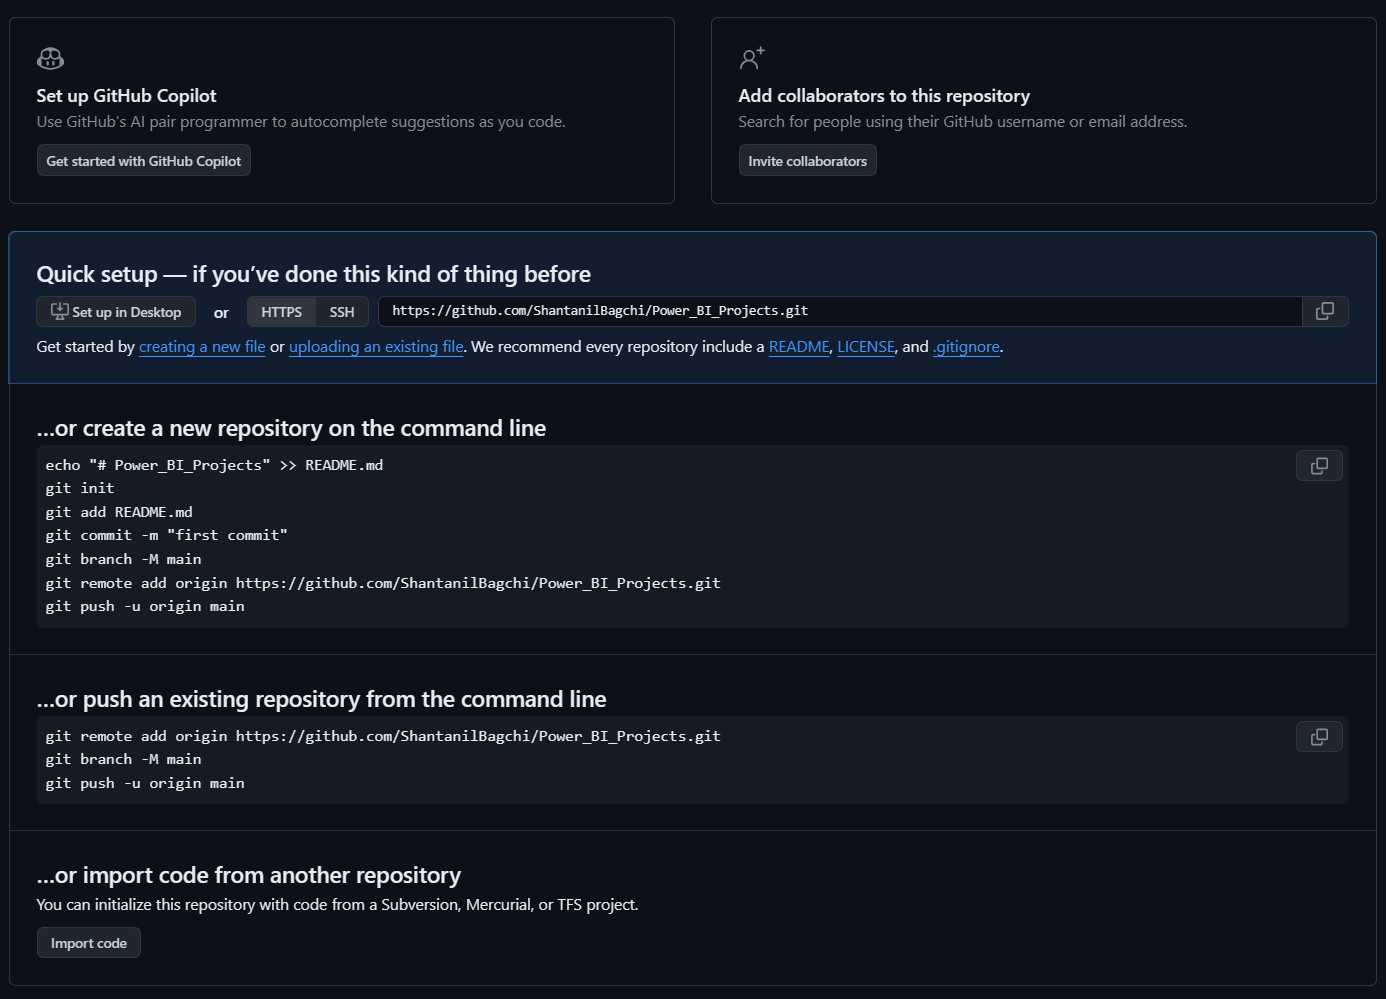
Once you've completed entering the information, click the 'Create repository' button to establish your new repository. As we've already initiated a new repository locally, our next step is to push it to GitHub using the command git push.
git pushupdates the remote repository with any commits made locally to a branch whereasgit pullupdates the local repo with updates from its remote counterpart. We use this command if a teammate has made commits on the remote repo, and we would like to see those changes in our local environment.
# Linking the GitHub repo link with our existing local repo

PS C:\Users\shant\OneDrive\Documents\GitHub\Power_BI_Project> git remote add origin https://github.com/ShantanilBagchi/PowerBI.git

PS C:\Users\shant\OneDrive\Documents\GitHub\Power_BI_Project> git push -u origin master

Enumerating objects: 24, done.
Counting objects: 100% (24/24), done.
Delta compression using up to 20 threads
Compressing objects: 100% (19/19), done.
Writing objects: 100% (24/24), 106.38 KiB | 7.09 MiB/s, done.
Total 24 (delta 2), reused 0 (delta 0), pack-reused 0
remote: Resolving deltas: 100% (2/2), done.
remote:
remote: Create a pull request for 'master' on GitHub by visiting:
remote:      https://github.com/ShantanilBagchi/PowerBI/pull/new/master
remote:
To https://github.com/ShantanilBagchi/PowerBI.git
 * [new branch]      master -> master
branch 'master' set up to track 'origin/master'.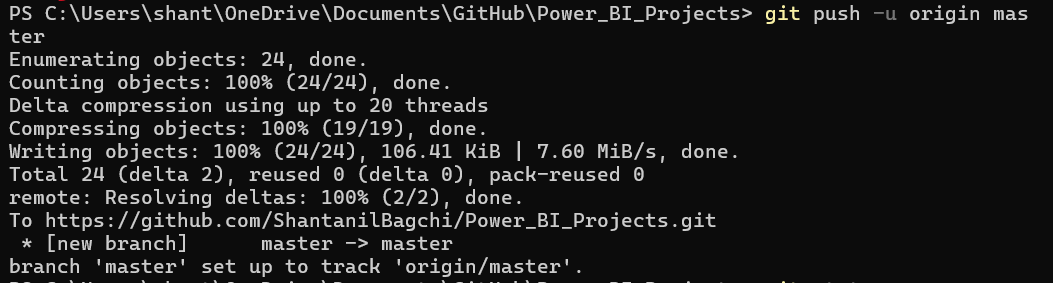
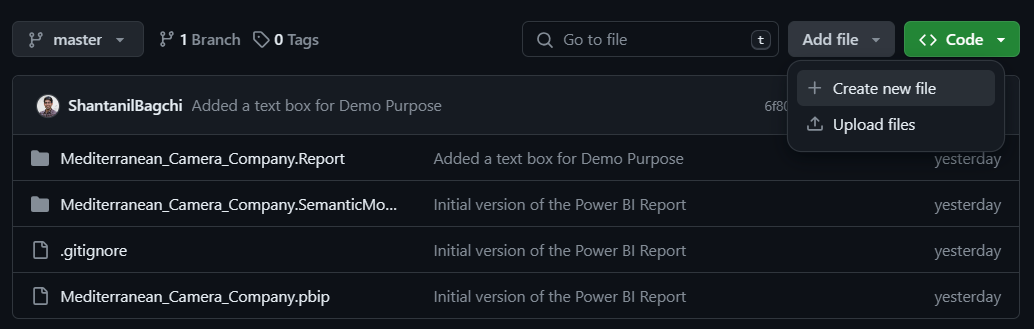
Once you refresh the GitHub page, you will see the recent changes and voila!! your project is now safe in the cloud.
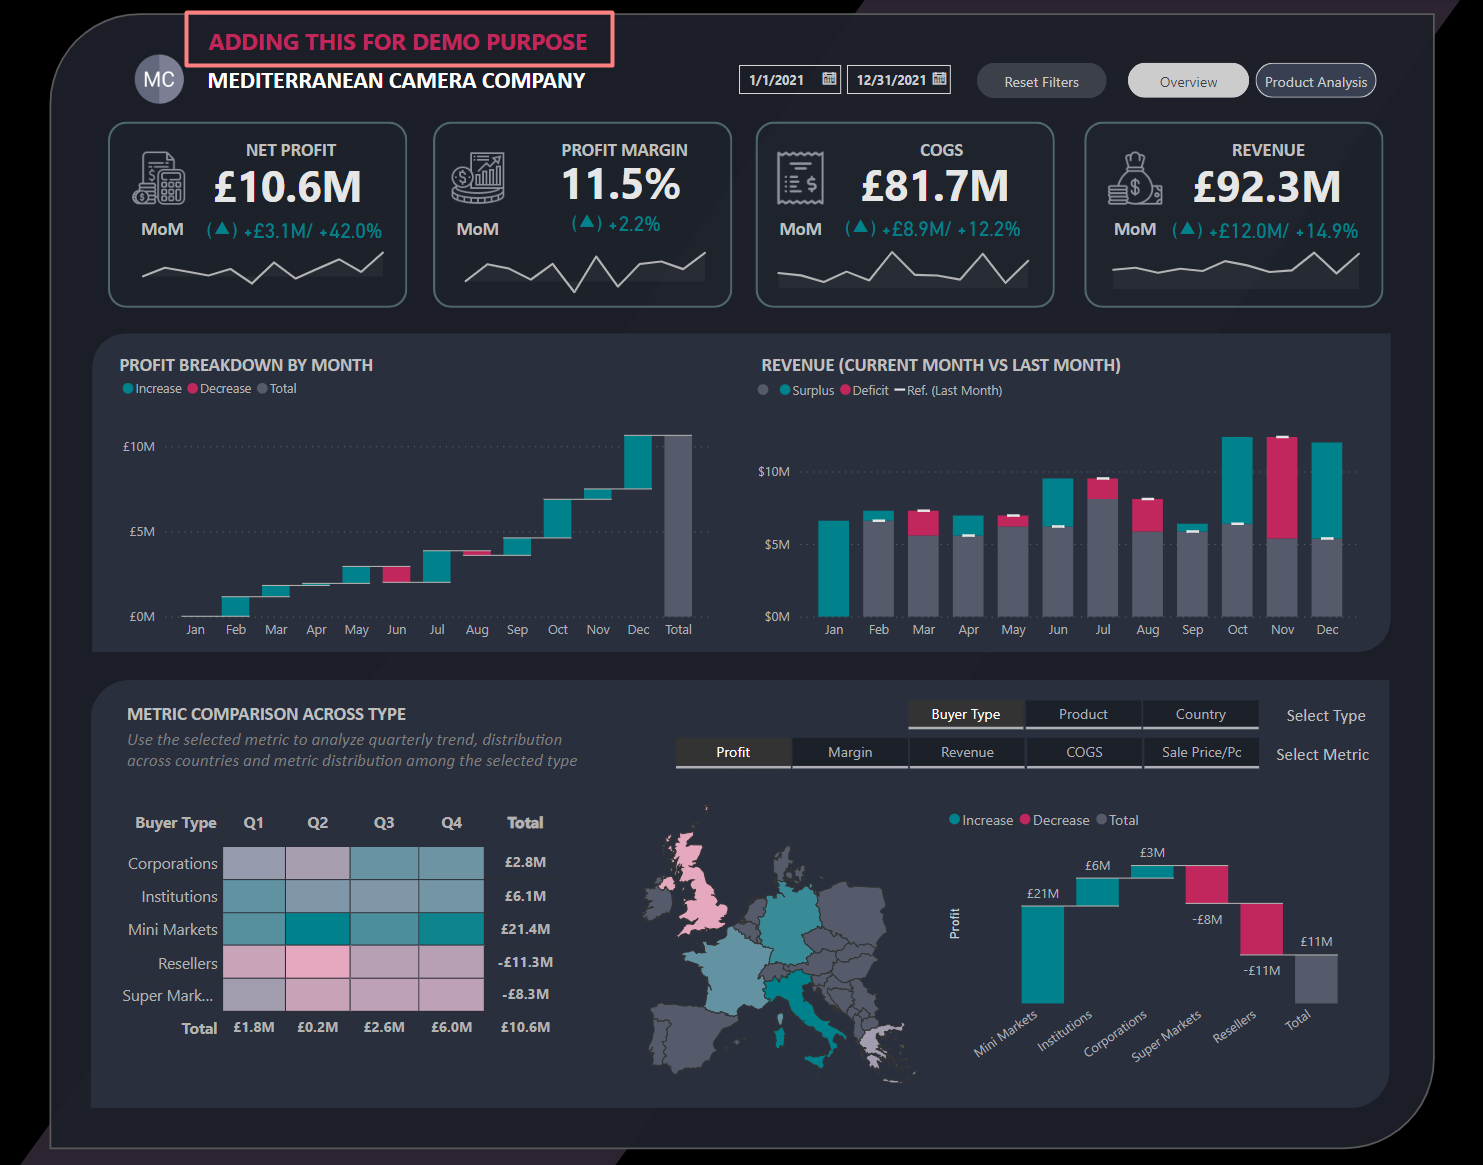
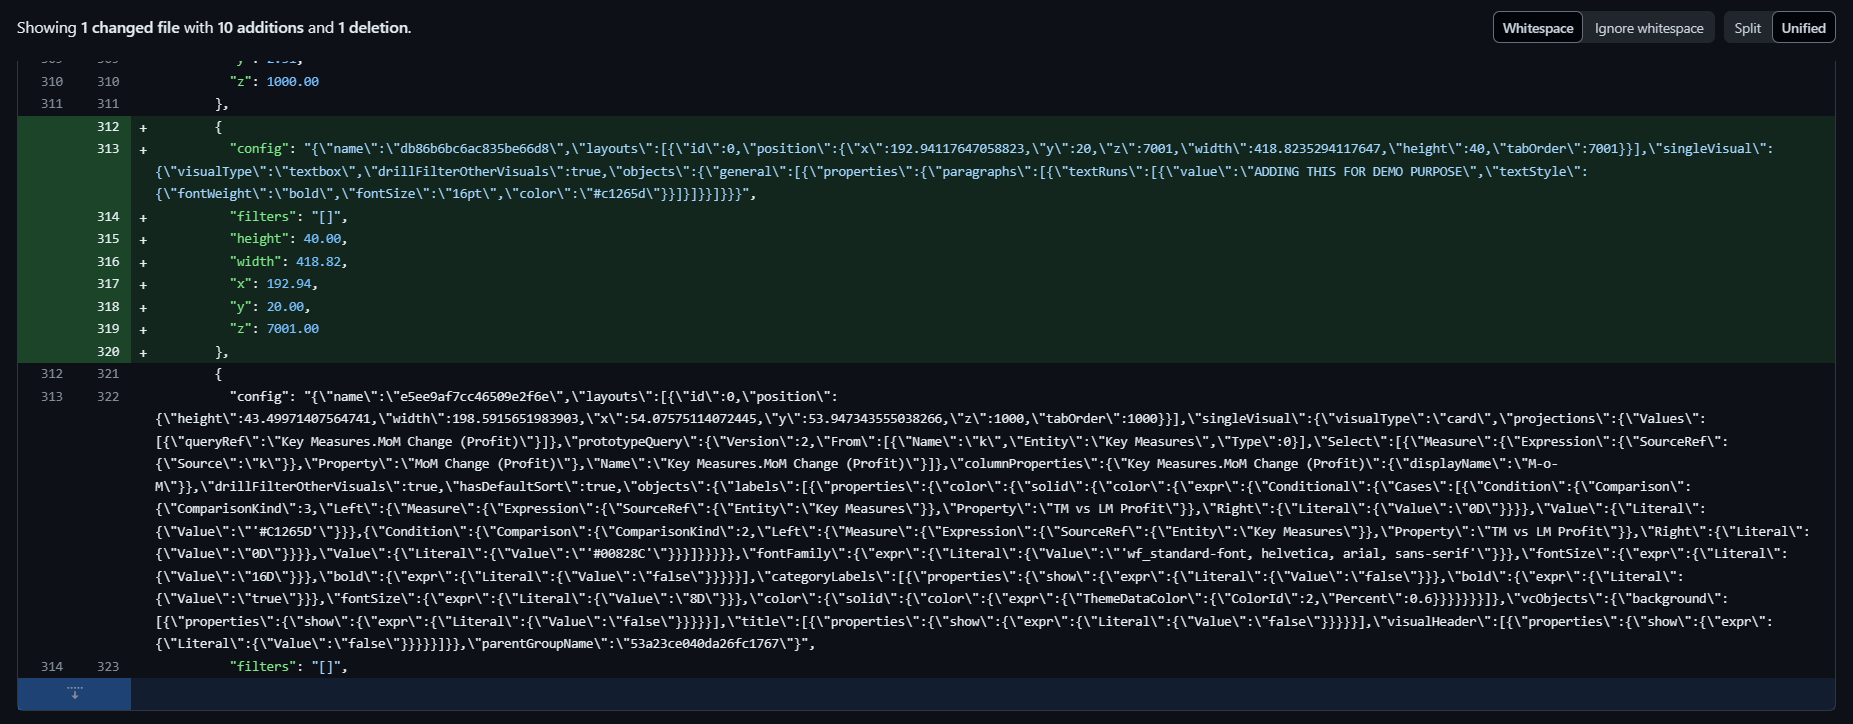
Let's make a minor modification to the existing report. We will add a new textbox. This scenario is a fantastic example to illustrate how Git keeps an eagle eye on even the smallest changes, ensuring every modification is tracked meticulously. Let's walk through the steps to commit this updated version of our project to the remote repository.
- Stage Your Changes: First up, use the
git addcommand to stage your modified file(s). - Commit the Changes Locally: Next, solidify your changes locally with
git commit -m "Added a textbox for Demo Purpose". This command takes a snapshot of our project in its current state, with a clear note on what we've done. - Push to the Remote Repository: Finally, with our changes committed locally, it’s time to share our progress by using
git push. This updates our remote repository on GitHub with your latest work.
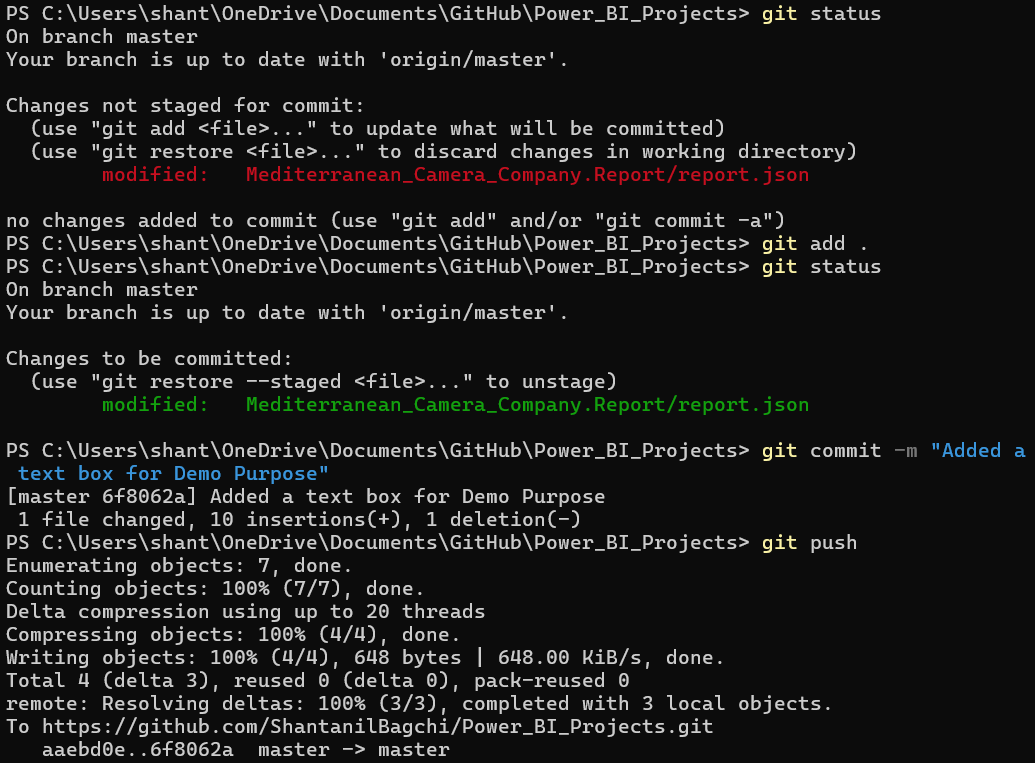
Here you can see the commit count changed from 1 to 2 after our recent push.
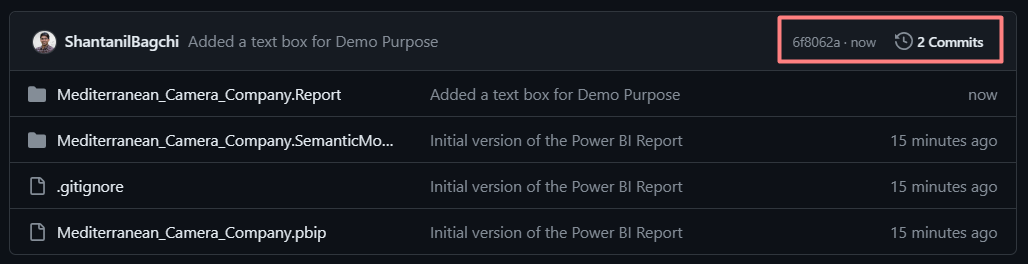
If we click on the commits, we see the recent changes to the report.json file as shown below. You can see that the new textbox is added to the existing JSON file.
Get changes on GitHub back to your system
Let's now experiment a little bit and make modifications directly to the remote repository. We will add a new markdown file to demonstrate what happens.

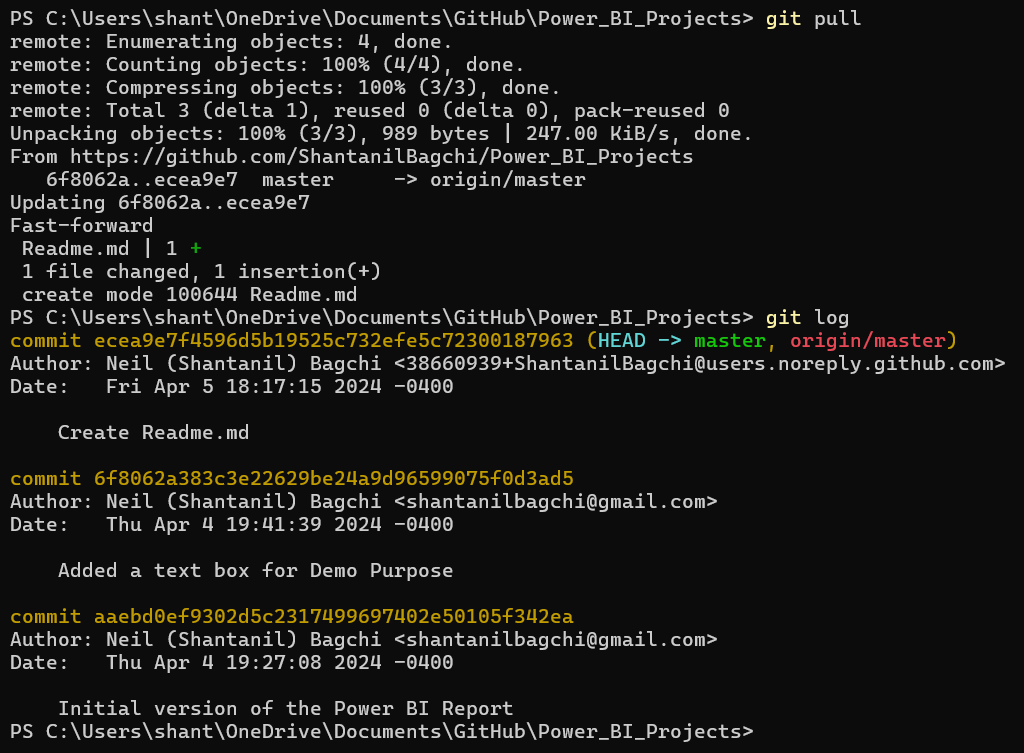
So, we've made some changes directly on GitHub, and our local repository and the one on GitHub aren't exactly mirror images anymore because the remote repo is one commit ahead of our local one. It's time to sync up and bring those changes down to our local machine.
If you're working directly on the primary branch, a simple git pull will do the trick (otherwise use the git pull origin master). This command is like a bridge, ensuring that your local project stays in step with its GitHub counterpart, reflecting all the latest changes. Now we can use the git log command again to see the new commit.
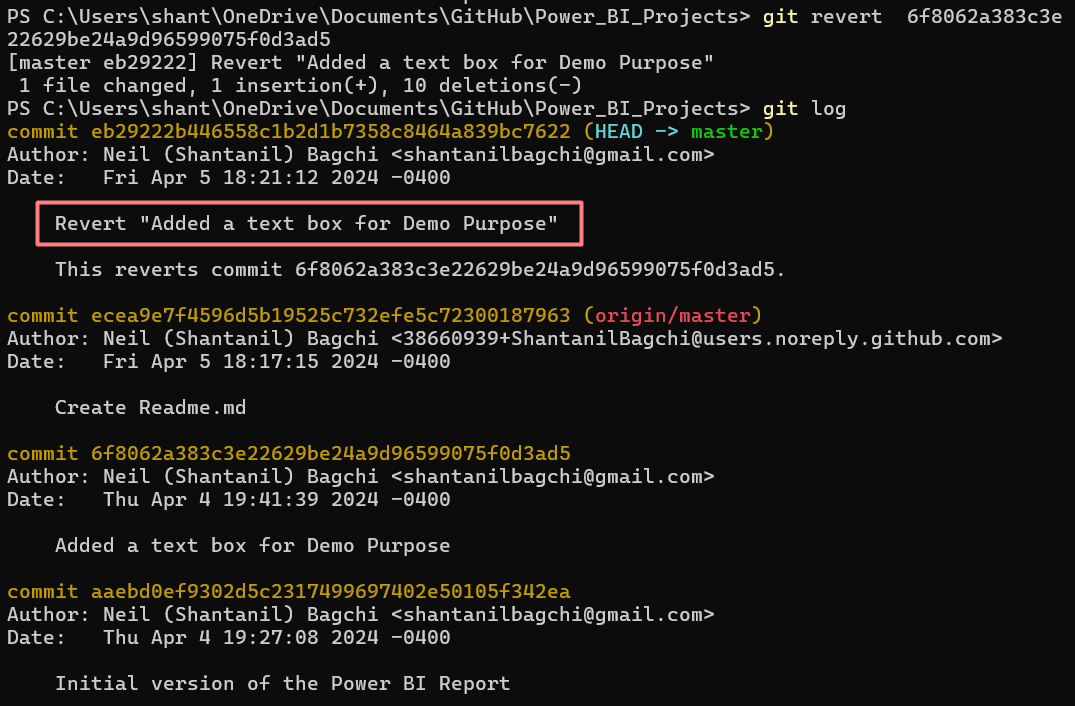
The final part of this post will show you how to revert back to a previous version of the project. This feature is especially handy when you encounter a bug or a feature implementation that doesn't go as planned. Instead of painstakingly undoing each change manually, Git allows you to revert to a snapshot where everything was in perfect harmony.
The command central for this time-traveling operation is git revert, which effectively undoes the changes made by a specific commit. What's brilliant about this approach is that it doesn't erase history. Instead, Git creates a new commit that inversely mirrors the changes of the commit you're undoing. This way, your project's history remains intact, offering a transparent trail of what went down and how it was addressed.
Moreover, if you wish to revisit a golden moment in your project's development, git checkout can transport your project's current state back to any given commit. While checkout is more about exploration and temporary adjustments (since it doesn't create a new commit for the changes), it's an incredible tool for comparisons or retrieving lost work. You can read more about these here and here.
We have just touched the tip of the iceberg. Branching, another hidden gem of Git allows you to explore new ideas, work on updates, or fix bugs without the fear of disturbing your main project (often referred to as the production branch). While we're not diving deep into branching in this post, it’s a topic well worth your curiosity.
Continuing your Journey
In this journey, we've explored the realms of Git and GitHub, exploring the essentials of version control. This journey, though packed with technicalities, is designed to act as a foundation needed to manage your Power BI projects (or any projects, for that matter) with grace, efficiency, and collaboration in mind. Dive deeper, experiment, and don't shy away from leveraging the full spectrum of tools and commands at your disposal- check out these more tutorials and resources:
Good introductory video to Git
Good video on advanced topics in Git
https://training.github.com/
Github’s official git cheat sheets! Handy for remembering the everyday commands you’ll use.
https://learngitbranching.js.org/
Feeling puzzled or fascinated by Git's branching system? It's completely natural! The branching mechanism is one of the most complex aspects of git, yet it's also one of the most potent. This tutorial offers a method to grasp git branches through a visual and intuitive approach.
And finally the official Git Documentation. That's it for this post. Feel free to check out my previous posts on XMLA endpoints, REST API, PowerShell cmdlets, Power BI Template Files and Power BI for Business Users.